As you know if you own the orange pi zero, the board run very hot. Running it without an heat sink is not really possible if your board is doing anything other than idling
and even with an heatsink you will encounter throttling if your application is a little intensive.
In an other article I managed to get a fan running controlled by the gpio’s.
A cron check every minute the cpu temperature, if it’s above a set temperature, the fan turn on.

If it’s under, the fan turns off.
The first time I did that project it was on my first orange pi zero. I made some mistakes in my wiring and, because of that, the fan only received 2.5v, it was spinning very slowly, and I was obliged to do some bash trickery to get the fan to start.
My original orangepi zero was lost during an apartment change.
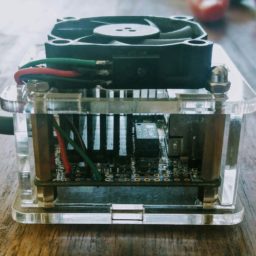
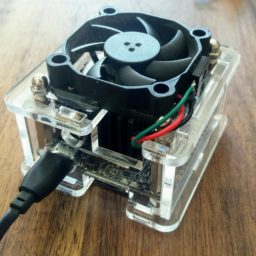
I decided to order a new one and this time, I wanted to do the best work I could to integrate the fan and heatsink.
I found an acrylic case for the orange pi zero on aliexpress.
And after receiving my orange pi zero, I saw the board was a new revision, it was running even hotter than my previous orange pi zero.
Few days after receiving the board, the case arrived. It was very pretty but it was blocking any air circulation. And the heatsink had no medium to dissipate the heat since the air was hot and not circulating around the metal.
The CPU temperature rapidly ascended to 80°c.
I own several old fans disassembled from old graphics card, and one of the small fans was just the perfect size. I cut a circular hole in the top acrylic plate so the air from the fan could enter and go trough the radiator fins. The air should after exit from a void in a face of the case were optional usb port are placed.
How to use that fan?
The problem with gpio’s is that they only push very weak current and volts (3.3v). You cannot run a fan directly from a gpio.
But you can use a gpio to control an electronic switch (a transistor) that will be able to run the fan
You should use a npn transistor. They are the most common and cost next to nothing. You will find them for free when you tear down old broken power supply.
To turn on and off your switch, you just have to send 1 or 0 on it’s base.
A great way to control the gpio’s of the opi zero is with the help of that library called WiringPI
you will find instructions on how to install the library on the github page.
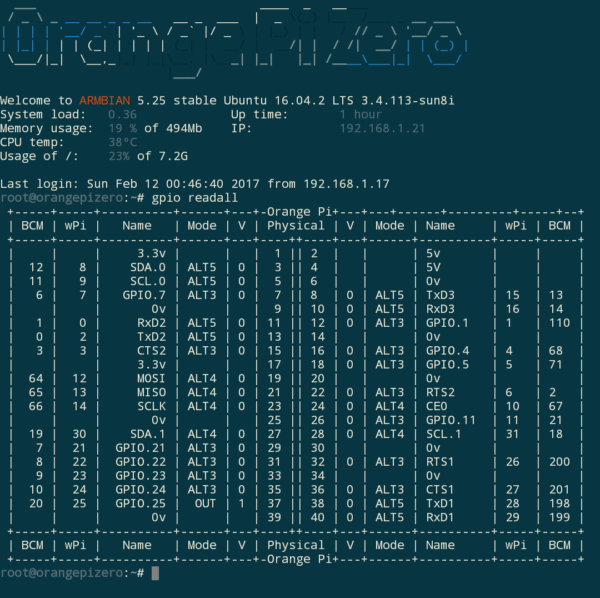
after installation lauch the command gpio readall
i chose the gpio.7 to control my fan ,
conveniently the gpio 7 is placed in the 7th place on the board , and his wPi alias is also 7
as you can see in the attached capture it’s not always the case !
i then solder my fan and transistor following this diagram :
To continue , i must write a script that check for the cpu temperature , and activate the fan if the cpu temperature is above a certain set threshold.
then , using crontab , set this script to launch every minutes.
add the line * * * * * /root/fan-control.sh to your cron jobs , using the command crontab -e
thanks to this script your fan should automatically launch when your Orange is charged , and stop when it’s return to idling.


Hello, this saved my orange pi zero from burning but how did you build it’s case?
If you have any svg file or another kind of format, may you send me that file?
I would like to 3d print it.
Hi 🙂
Hello Umbeto ,
I’ve purchased that case on aliexpress,
it cost about 4$
nice info, about gpio current and voltage
Hi,
I bought my Orange Pi Zeronwith “official” case and I extension board. I drilled a hole on the side and installed standard Raspberry Pi fan and heatsink. It is connected to on-board 5v connector.
When room temperature is 25C it runs at 40C-67C. Depends on load. It seems that it is by design quite hot.
I think they should clearly state that a fan and a heatsink is recommended.
Hi.
Thanks for sharing this info, just bought one of these and was searching info to do things right. One remark: generally, for driving some load from an mc pin a better choice would be logic level mosfet and not an npn. Thanks again.